搜索到
9
篇与
的结果
-
 Spring常用注解介绍(IOC) bean的定义 bean的作用域 bean的生命周期 @Bean加载第三方资源 bean的非引用类型属性注入 bean的引用类型属性注入 注解加载properties文件 @Configuration和@ComponentScan用法 第三方bean配置与管理 bean加载控制 bean的定义名称:@Component @Controller @Service @Repository类型:类注解位置:类定义上方作用:设置该类为spring管理的bean范例:@Component public class ClassName{}说明:@Controller、@Service 、@Repository是@Component的衍生注解,功能同@Component相关属性value(默认):定义bean的访问idbean的作用域名称:@Scope类型:类注解位置:类定义上方作用:设置该类作为bean对应的scope属性范例:@Scope public class ClassName{}相关属性value(默认):定义bean的作用域,默认为singletonbean的生命周期名称:@PostConstruct、@PreDestroy类型:方法注解位置:方法定义上方作用:设置该类作为bean对应的生命周期方法范例:@PostConstruct public void init() { System.out.println("init..."); }@Bean加载第三方资源类型:方法注解位置:方法定义上方作用:设置该方法的返回值作为spring管理的bean范例:@Bean("dataSource") public DruidDataSource createDataSource() { return ……; }说明:因为第三方bean无法在其源码上进行修改,使用@Bean解决第三方bean的引入问题该注解用于替代XML配置中的静态工厂与实例工厂创建bean,不区分方法是否为静态或非静态@Bean所在的类必须被spring扫描加载,否则该注解无法生效相关属性value(默认):定义bean的访问idbean的非引用类型属性注入名称:@Value类型:属性注解、方法注解位置:属性定义上方,方法定义上方作用:设置对应属性的值或对方法进行传参范例:@Value("${jdbc.username}") private String username;说明:value值仅支持非引用类型数据,赋值时对方法的所有参数全部赋值value值支持读取properties文件中的属性值,通过类属性将properties中数据传入类中value值支持SpEL@value注解如果添加在属性上方,可以省略set方法(set方法的目的是为属性赋值)相关属性value(默认):定义对应的属性值或参数值bean的引用类型属性注入1.名称:@Autowired、@Qualifier类型:属性注解、方法注解位置:属性定义上方,方法定义上方作用:设置对应属性的对象或对方法进行引用类型传参范例:@Autowired(required = false) @Qualifier("userDao") private UserDao userDao;说明:@Autowired默认按类型装配,指定@Qualifier后可以指定自动装配的bean的id相关属性required:定义该属性是否允许为null2.名称:@Primary类型:类注解位置:类定义上方作用:设置类对应的bean按类型装配时优先装配范例:@Primary public class ClassName{}说明:@Autowired默认按类型装配,当出现相同类型的bean,使用@Primary提高按类型自动装配的优先级,多个@Primary会导致优先级设置无效3.名称:@Inject、@Named、@Resource说明:@Inject与@Named是JSR330规范中的注解,功能与@Autowired和@Qualifier完全相同,适用于不同架构场景@Resource是JSR250规范中的注解,可以简化书写格式@Resource相关属性name:设置注入的bean的idtype:设置注入的bean的类型,接收的参数为Class类型加载properties文件名称:@PropertySource类型:类注解位置:类定义上方作用:加载properties文件中的属性值范例:@PropertySource(value = "classpath:filename.properties") public class ClassName { @Value("${propertiesAttributeName}") private String attributeName; }说明:不支持*通配格式,一旦加载,所有spring控制的bean中均可使用对应属性值相关属性value(默认):设置加载的properties文件名ignoreResourceNotFound:如果资源未找到,是否忽略,默认为false@Configuration和@ComponentScan用法名称:@Configuration、@ComponentScan类型:类注解位置:类定义上方作用:设置当前类为spring核心配置加载类范例:@Configuration @ComponentScan("scanPackageName") public class SpringConfigClassName{ }说明:核心配合类用于替换spring核心配置文件,此类可以设置空的,不设置变量与属性bean扫描工作使用注解@ComponentScan替代AnnotationConfigApplicationContext加载纯注解格式上下文对象,需要使用AnnotationConfigApplicationContextAnnotationConfigApplicationContext ctx = new AnnotationConfigApplicationContext(SpringConfig.class);第三方bean配置与管理名称:@Import类型:类注解位置:类定义上方作用:导入第三方bean作为spring控制的资源范例:@Import({JDBCConfig.class,MyBatisConfig.class}) public class SpringConfig { }说明:@Import注解在同一个类上,仅允许添加一次,如果需要导入多个,使用数组的形式进行设定在被导入的类中可以继续使用@Import导入其他资源(了解)@Bean所在的类可以使用导入的形式进入spring容器,无需声明为beanbean加载控制(1)@DependsOn名称:@DependsOn类型:类注解、方法注解位置:bean定义的位置(类上或方法上)作用:控制bean的加载顺序,使其在指定bean加载完毕后再加载范例:@DependsOn("beanId") public class ClassName { }说明:配置在方法上,使@DependsOn指定的bean优先于@Bean配置的bean进行加载配置在类上,使@DependsOn指定的bean优先于当前类中所有@Bean配置的bean进行加载配置在类上,使@DependsOn指定的bean优先于@Component等配置的bean进行加载相关属性value(默认):设置当前bean所依赖的bean的id(2)@Order名称:@Order类型:配置类注解位置:配置类定义的位置(类上)作用:控制配置类的加载顺序范例:@Order(1) public class SpringConfigClassName { }(3)@Lazy名称:@Lazy类型:类注解、方法注解位置:bean定义的位置(类上或方法上)作用:控制bean的加载时机,使其延迟加载范例:@Lazy public class ClassName { }依赖加载应用场景@DependsOn微信订阅号,发布消息和订阅消息的bean的加载顺序控制双11活动期间,零点前是结算策略A,零点后是结算策略B,策略B操作的数据为促销数据。策略B加载顺序与促销数据的加载顺序@Lazy程序灾难出现后对应的应急预案处理是启动容器时加载时机@Order多个种类的配置出现后,优先加载系统级的,然后加载业务级的,避免细粒度的加载控制
 -
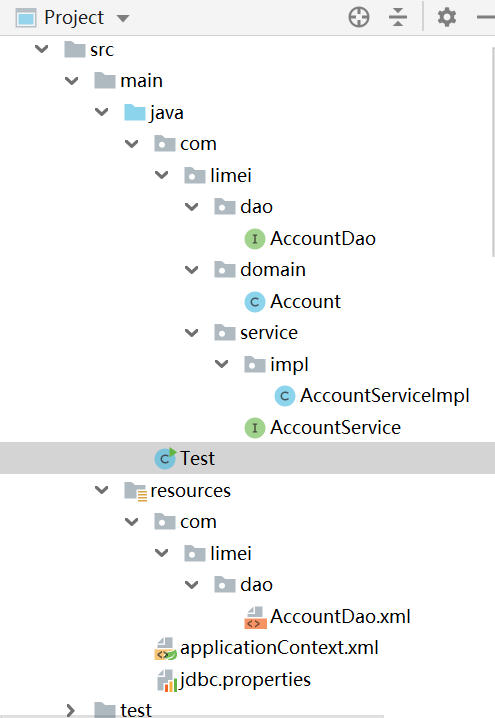
spring整合mybatis案例(IOC) spring整合mybatis案例首先需要sql:sql结构下载。 1.坐标pom.xml文件和实体类 2.编写业务层接口与实现类 3.编写持久层接口与对应的xml文件 4.建立applicationContext.xml配置文件 5.jdbc.properties资源 6.Test类 案例目录结构1.pom.xml文件<?xml version="1.0" encoding="UTF-8"?> <project xmlns="http://maven.apache.org/POM/4.0.0" xmlns:xsi="http://www.w3.org/2001/XMLSchema-instance" xsi:schemaLocation="http://maven.apache.org/POM/4.0.0 http://maven.apache.org/xsd/maven-4.0.0.xsd"> <modelVersion>4.0.0</modelVersion> <groupId>com</groupId> <artifactId>java-01</artifactId> <version>1.0-SNAPSHOT</version> <dependencies> <dependency> <groupId>org.mybatis</groupId> <artifactId>mybatis</artifactId> <version>3.5.3</version> </dependency> <dependency> <groupId>mysql</groupId> <artifactId>mysql-connector-java</artifactId> <version>5.1.47</version> </dependency> <dependency> <groupId>org.springframework</groupId> <artifactId>spring-context</artifactId> <version>5.1.9.RELEASE</version> </dependency> <dependency> <groupId>org.springframework</groupId> <artifactId>spring-jdbc</artifactId> <version>5.1.9.RELEASE</version> </dependency> <dependency> <groupId>com.alibaba</groupId> <artifactId>druid</artifactId> <version>1.1.16</version> </dependency> <dependency> <groupId>org.mybatis</groupId> <artifactId>mybatis-spring</artifactId> <version>1.3.0</version> </dependency> </dependencies> </project>package com.limei.domain; import java.io.Serializable; public class Account implements Serializable { private Integer id; private String name; private Double money; public Integer getId() { return id; } public void setId(Integer id) { this.id = id; } public String getName() { return name; } public void setName(String name) { this.name = name; } public Double getMoney() { return money; } public void setMoney(Double money) { this.money = money; } @Override public String toString() { return "Account{" + "id=" + id + ", name='" + name + '\'' + ", money=" + money + '}'; } } 2.编写业务层接口与实现类package com.limei.service; import com.limei.domain.Account; import java.util.List; public interface AccountService { void save(Account account); void delete(Integer id); void update(Account account); List<Account> findAll(); Account findById(Integer id); } package com.limei.service.impl; import com.limei.dao.AccountDao; import com.limei.domain.Account; import com.limei.service.AccountService; import java.util.List; public class AccountServiceImpl implements AccountService { private AccountDao accountDao; public void setAccountDao(AccountDao accountDao) { this.accountDao = accountDao; } public void save(Account account) { accountDao.save(account); } public void update(Account account){ accountDao.update(account); } public void delete(Integer id) { accountDao.delete(id); } public Account findById(Integer id) { return accountDao.findById(id); } public List<Account> findAll() { return accountDao.findAll(); } } 3.编写持久层接口与对应的xml文件package com.limei.dao; import com.limei.domain.Account; import java.util.List; public interface AccountDao { void save(Account account); void delete(Integer id); void update(Account account); List<Account> findAll(); Account findById(Integer id); } <?xml version="1.0" encoding="UTF-8"?> <!DOCTYPE mapper PUBLIC "-//mybatis.org//DTD Mapper 3.0//EN" "http://mybatis.org/dtd/mybatis-3-mapper.dtd"> <mapper namespace="com.limei.dao.AccountDao"> <!--配置根据id查询--> <select id="findById" resultType="account" parameterType="int"> select * from account where id = #{id} </select> <!--配置查询所有--> <select id="findAll" resultType="account"> select * from account </select> <!--配置保存--> <insert id="save" parameterType="account"> insert into account(name,money)values(#{name},#{money}) </insert> <!--配置删除--> <delete id="delete" parameterType="int"> delete from account where id = #{id} </delete> <!--配置更新--> <update id="update" parameterType="account"> update account set name=#{name},money=#{money} where id=#{id} </update> </mapper>4.建立applicationContext.xml配置文件<?xml version="1.0" encoding="UTF-8"?> <beans xmlns="http://www.springframework.org/schema/beans" xmlns:xsi="http://www.w3.org/2001/XMLSchema-instance" xmlns:context="http://www.springframework.org/schema/context" xsi:schemaLocation="http://www.springframework.org/schema/beans https://www.springframework.org/schema/beans/spring-beans.xsd http://www.springframework.org/schema/context https://www.springframework.org/schema/context/spring-context.xsd"> <!--加载perperties配置文件的信息,spring的加载方式--> <context:property-placeholder location="classpath:*.properties"/> <!--加载druid资源--> <bean id="dataSource" class="com.alibaba.druid.pool.DruidDataSource"> <property name="driverClassName" value="${jdbc.driver}" /> <property name="url" value="${jdbc.url}" /> <property name="username" value="${jdbc.username}" /> <property name="password" value="${jdbc.password}" /> </bean> <!--配置service作为spring的bean,注入dao--> <bean id="accountService" class="com.limei.service.impl.AccountServiceImpl"> <property name="accountDao" ref="accountDao"/> </bean> <!--spring整合mybatis后控制的创建连接用的对象--> <bean class="org.mybatis.spring.SqlSessionFactoryBean"> <property name="dataSource" ref="dataSource"/> <property name="typeAliasesPackage" value="com.limei.domain"/> </bean> <!--加载mybatis映射配置的扫描,将其作为spring的bean进行管理--> <bean class="org.mybatis.spring.mapper.MapperScannerConfigurer"> <property name="basePackage" value="com.limei.dao"/> </bean> </beans>5.jdbc.properties资源jdbc.driver=com.mysql.jdbc.Driver jdbc.url=jdbc:mysql://localhost:3306/lianxi jdbc.username=root jdbc.password=1234566.Test类import com.limei.domain.Account; import com.limei.service.AccountService; import org.springframework.context.ApplicationContext; import org.springframework.context.support.ClassPathXmlApplicationContext; public class Test { public static void main(String[] args) { ApplicationContext ctx = new ClassPathXmlApplicationContext ("applicationContext.xml"); AccountService accountService = (AccountService) ctx.getBean("accountService"); Account ac = accountService.findById(3); System.out.println(ac); // Account account = new Account(); // account.setName("Tom"); // account.setMoney(123456.78); // // accountService.save(account); } }
-
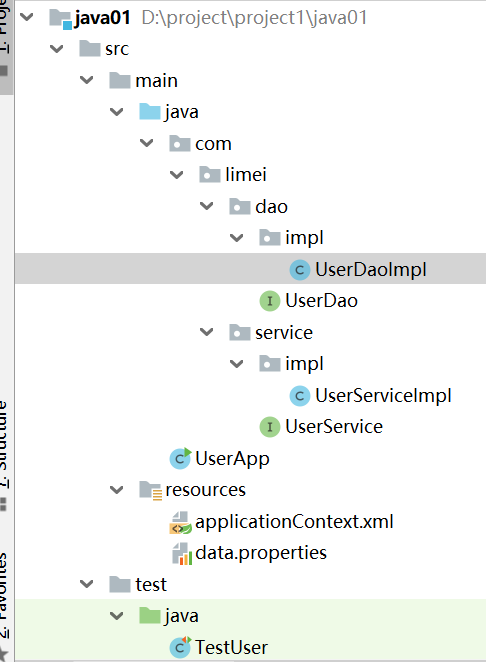
Spring入门案例(IOC) IoC入门案例制作步骤 1.spring坐标pom.xml文件 2.编写业务层接口与实现类 3.编写持久层接口与实现类 4.建立spring配置文件 5.data.properties资源 6.TestUser测试类通过spring获取资源(Service实例) 案例目录结构1.pom.xml文件<?xml version="1.0" encoding="UTF-8"?> <project xmlns="http://maven.apache.org/POM/4.0.0" xmlns:xsi="http://www.w3.org/2001/XMLSchema-instance" xsi:schemaLocation="http://maven.apache.org/POM/4.0.0 http://maven.apache.org/xsd/maven-4.0.0.xsd"> <modelVersion>4.0.0</modelVersion> <groupId>com</groupId> <artifactId>java-01</artifactId> <version>1.0-SNAPSHOT</version> <dependencies> <dependency> <groupId>org.springframework</groupId> <artifactId>spring-context</artifactId> <version>5.1.9.RELEASE</version> </dependency> <dependency> <groupId>com.alibaba</groupId> <artifactId>druid</artifactId> <version>1.1.16</version> </dependency> <dependency> <groupId>junit</groupId> <artifactId>junit</artifactId> <version>4.12</version> <scope>test</scope> </dependency> </dependencies> </project>2.编写业务层与表现层(模拟)接口与实现类package com.limei.service; public interface UserService { public void save(); } package com.limei.service.impl; import com.limei.dao.UserDao; import com.limei.service.UserService; public class UserServiceImpl implements UserService { public UserServiceImpl() { } private UserDao userDao; private int num; public void setNum(int num) { this.num = num; } //1.对需要进行注入的变量加set方法 public void setUserDao(UserDao userDao) { this.userDao = userDao; } public void save() { System.out.println("user service running..."+num); userDao.save(); } } 3.编写持久层层接口与实现类 package com.limei.dao; public interface UserDao { public void save(); } package com.limei.dao.impl; import com.limei.dao.UserDao; public class UserDaoImpl implements UserDao{ private String userName; private String password; private int num; private String name; public UserDaoImpl() { } public void setNum(int num) { this.num = num; } public void setUserName(String userName) { this.userName = userName; } public void setPassword(String password) { this.password = password; } public void setName(String name) { this.name = name; } public void save(){ System.out.println("user dao running..."+userName+" "+password+" "+num ); } } 4.建立spring配置文件applicationContext.xml<?xml version="1.0" encoding="UTF-8"?> <beans xmlns="http://www.springframework.org/schema/beans" xmlns:xsi="http://www.w3.org/2001/XMLSchema-instance" xmlns:p="http://www.springframework.org/schema/p" xmlns:context="http://www.springframework.org/schema/context" xsi:schemaLocation="http://www.springframework.org/schema/beans https://www.springframework.org/schema/beans/spring-beans.xsd http://www.springframework.org/schema/context https://www.springframework.org/schema/context/spring-context.xsd"> <!--1.加载context命名空间的支持--> <!--xmlns:context="http://www.springframework.org/schema/context"--> <!--2.加载配置文件--> <context:property-placeholder location="classpath:data.properties" /> <!--2.将要注入的资源声明为bean--> <bean id="userDao" class="com.limei.dao.impl.UserDaoImpl" > <property name="userName" value="${username1}"/> <property name="password" value="${pwd}"/> <!--<property name="name" value="${name1}"/>--> <property name="num" value="99999999"></property> </bean> <!--<bean id="bookDao" class="com.limei.dao.impl.BookDaoImpl"/>--> <bean id="userService" class="com.limei.service.impl.UserServiceImpl"> <!--3.ref为引用类型,name为UserServiceImpl里的setUserDao--> <property name="userDao" ref="userDao"/> <property name="num" value="1234"></property> </bean> </beans>5.data.properties资源username1=root123 pwd=1236.TestUser测试类通过spring获取资源(Service实例) import com.limei.service.UserService; import org.junit.Test; import org.springframework.context.ApplicationContext; import org.springframework.context.support.ClassPathXmlApplicationContext; public class TestUser { @Test public void save(){ ApplicationContext ctx = new ClassPathXmlApplicationContext ("applicationContext.xml"); // ApplicationContext ctx = new ClassPathXmlApplicationContext("applicationContext-user.xml","applicationContext-book.xml"); UserService userService = (UserService) ctx.getBean("userService"); userService.save(); } }
-
Spring的介绍 bean的属性介绍 集合类型数据注入 统一属性注入格式 properties文件 import的使用 ApplicationContext介绍 第三方资源配置 IoC配置(XML格式)基本属性:<bean id="beanId" name="别名1,别名2" class="ClassName"></bean> id:bean的名称,通过id值获取bean class:bean的类型 name:bean的名称,可以通过name值获取bean,用于多人配合时给bean起别名格式:<bean scope="singleton"></bean>取值:singleton:设定创建出的对象保存在spring容器中,是一个单例的对象prototype:设定创建出的对象保存在spring容器中,是一个非单例的对象request、session、application、 websocket :设定创建出的对象放置在web容器对应的位置格式:<bean init-method="init" destroy-method="destroy> </bean>取值:bean对应的类中对应的具体方法名注意事项:当scope=“singleton”时,spring容器中有且仅有一个对象,init方法在创建容器时仅执行一次当scope=“prototype”时,spring容器要创建同一类型的多个对象,init方法在每个对象创建时均执行一次当scope=“singleton”时,关闭容器会导致bean实例的销毁,调用destroy方法一次当scope=“prototype”时,对象的销毁由垃圾回收机制gc()控制,destroy方法将不会被执行基本属性:<property name="propertyName" value="propertyValue" ref="beanId" /> name:对应bean中的属性名,要求该属性必须提供可访问的set方法(严格规范为此名称是set方法对应名称) value:设定非引用类型属性对应的值,不能与ref同时使用 ref:设定引用类型属性对应bean的id ,不能与value同时使用注意:一个bean可以有多个property标签集合类型数据注入名称:array,list,set,map,props类型:标签归属:property标签 或 constructor-arg标签作用:注入集合数据类型属性格式:<property> <list></list> </property>(1)集合类型数据注入——list<property name="al"> <list> <value>limei</value> <value>66666</value> </list> </property>(2)集合类型数据注入——props<property name="properties"> <props> <prop key="name">limei</prop> <prop key="value">666666</prop> </props> </property>(3)集合类型数据注入——array (了解)<property name="arr"> <array> <value>123456</value> <value>66666</value> </array> </property>(4)集合类型数据注入——set(了解)<property name="hs"> <set> <value>limei</value> <value>66666</value> </set> </property>(5)集合类型数据注入——map(了解)<property name="hm"> <map> <entry key="name" value="limei"/> <entry key="value" value="6666666666"/> </map> </property>统一属性注入格式Spring提供了对EL表达式的支持,统一属性注入格式类型:属性值归属:value属性值作用:为bean注入属性值格式:<bean><property value="EL"></bean>注意:所有属性值不区分是否引用类型,统一使用value赋值所有格式统一使用 value=“”常量 #{10} #{3.14} #{2e5} #{‘itcast’}引用bean #{beanId}引用bean属性 #{beanId.propertyName}引用bean方法 beanId.methodName().method2()引用静态方法 T(java.lang.Math).PI运算符支持 #{3 lt 4 == 4 ge 3}正则表达式支持 #{user.name matches‘[a-z]{6,}’}集合支持 #{likes[3]}案例:<bean id="userService" class="com.limei.service.impl.UserServiceImpl"> <property name="userDao" value="#{userDao}"/> <property name="bookDao" value="#{bookDao}"/> <property name="num" value="#{666666666}"/> <property name="version" value="#{'limei'}"/> </bean>properties文件Spring提供了读取外部properties文件的机制,使用读取到的数据为bean的属性赋值操作步骤1.准备外部properties文件2.开启context命名空间支持xmlns:context="http://www.springframework.org/schema/context"3.加载指定的properties文件<context:property-placeholder location="classpath:filename.properties"/>4.使用加载的数据<property name="propertyName" value="${propertiesName}"/>注意:如果需要加载所有的properties文件,可以使用*.properties表示加载所有的properties文件注意:读取数据使用${propertiesName}格式进行,其中propertiesName指properties文件中的属性名import的使用类型:标签归属:beans标签作用:在当前配置文件中导入其他配置文件中的项格式:<beans> <import /> </beans>基本属性:<import resource=“config.xml"/>-resource:加载的配置文件名Spring容器加载多个配置文件new ClassPathXmlApplicationContext("config1.xml","config2.xml");Spring容器中的bean定义冲突问题同id的bean,后定义的覆盖先定义的导入配置文件可以理解为将导入的配置文件复制粘贴到对应位置导入配置文件的顺序与位置不同可能会导致最终程序运行结果不同ApplicationContext介绍1.ApplicationContext是一个接口,提供了访问spring容器的API2.ClassPathXmlApplicationContext是一个类,实现了上述功能3.ApplicationContext的顶层接口是BeanFactory4.BeanFactory定义了bean相关的最基本操作5.ApplicationContext在BeanFactory基础上追加了若干新功能对比BeanFactory1.BeanFactory创建的bean采用延迟加载形式,使用才创建2.ApplicationContext创建的bean默认采用立即加载形式FileSystemXmlApplicationContext可以加载文件系统中任意位置的配置文件,而ClassPathXmlApplicationContext只能加载类路径下的配置文件BeanFactoryResource res = new ClassPathResource("applicationContext.xml"); BeanFactory bf = new XmlBeanFactory(res); UserService userService = (UserService)bf.getBean("userService");第三方资源配置阿里数据源方案Druid<bean id="dataSource" class="com.alibaba.druid.pool.DruidDataSource"> <property name="driverClassName" value="com.mysql.jdbc.Driver"></property> <property name="url" value="jdbc:mysql://localhost:3306/spring_ioc"></property> <property name="username" value="root"></property> <property name="password" value="root"></property> </bean>